Thursday, December 29, 2011

Sewing Again!

I've started working on some items that I could really use.

One of those is a warm jacket.  We've had a few freezing nights, but here in Texas, winter is really yet to come.

I've had this pattern for several years.  Now, it's  OOP. 


Then son #1 gave me some lovely red wool (it's a long story why he had this...and I think I had helped pay for this, so it wasn't completely free....) and the jacket was a GO!

I bought (on sale) some bright shimmery purple rayon to line it.  They look wonderful together!

So far, it hasn't been too hard, though I've never done anything like this before.  I've had to consult my sewing books as the directions are pretty sparse and the illustrations are none too clear....but so far, so good! 

Pictures soon.....


Sunday, December 25, 2011

Merry Christmas!


For unto you is born this day in the city of David a Savior,
who is Christ the Lord.
Luke 2:11

Saturday, December 24, 2011

Christmas Crackers, Continued....

Continuing....I had to quickly pick up and vacuum up all the stray shreds, as well as pause to pull some out of Titus' mouth.  I really didn't want to make an emergency trip to the vet.

Then I got further sidetracked with laundry, went to Christmas Eve services at our church, and made our traditional Christmas Eve dinner of tamales (purchased), rice and refried beans.

So, back to the crackers!

Here they are with name tags:

If I had been thinking more clearly, I would have used golden-color cellophane and gold shreds.  Next time...

Anyhow, here's how I plan to set the table tomorrow:

But right now I'm going to put these crackers away so certain cats (you know who you are) don't eat them overnight!

So, to all a good night!  And Merry Christmas!


Crackers! Finally, Finals are Over!

We had finals THIS WEEK!  Can you believe?  I took a final on Tuesday and was finally DONE for the semester.  Also got the Class Project from the netherworld done and turned in on Monday.


Source
Caveat: It was actually quite an interesting project.  I just didn't enjoy working on it so LATE in the year when I had better things to do!

Then I cleaned upstairs for two (yes, two! 2!) whole days.  One bedroom, one den and one teensy bathroom.  It's been the dumping ground for son #2 (with a bit of assistance in dumping stuff from son #3) and needed a ton of work.


Source
So now it's time for Christmas!

Source
Here's quick last-minute project: Christmas Crackers.


These beautiful crackers are from "Old English Crackers" online store,
where you can buy all sorts of cracker supplies (to make your own)
or ready-made crackers.
Not having enough time to order the "cracker snaps" that go POP when you tug open the cracker, I settled for the basic, non-popping cracker.

BTW, for great instructions on making crackers with the snaps, see "Not Martha"'s post on the subject.

Supplies I used:
Cardboard tubes (I used wrapping-paper tubes--you can use toilet paper tubes also)
Wrapping paper (already purchased)
Cellophane paper $1
Shreds $1
Little tiny gifts/candies/items $5
Jokes (printed out and cut apart)
Ribbon ($1)
Tape
Scissors

I went to the dollar store and purchased my supplies for less than $10!

Here's the little gifts (and sorry for the lousy photos!):
Fake mustaches
Little bubbles (found in wedding stuff)
Party horns (found in the New Year's decorations)
Kisses!
 Remember these?
 Hair clips for the ladies
Dumb jokes....

I cut the cardboard tubes 10" long to accomodate all the "gifts", using a serrated knife so I wouldn't crush the cardboard.

I cut the wrapping paper a couple of inches longer than the tube and wide enough to go around the tube and overlap. Then I cut the cellophane even longer than the wrapping paper.

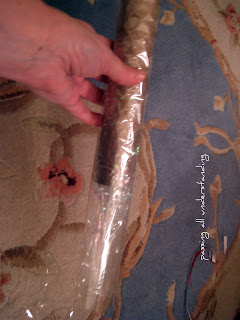
Stuff the gifts and jokes inside, and then stuff some of the shreds into each end of the tube, letting some of it stick out the ends:

Wrap in cellophane first:

Then in the wrapping paper.  See how I let the shreds show through the cellophane? I gave it a bit of a haircut:

And tie off---I curled the ribbon:


Next...
Oh, no, one of the cats is eating the shreds! 
I'll be back in a minute.......

Monday, December 12, 2011

Give-Away!


Well, the give-away is over!
Congratulations to "House of Pinheiro" and to "The Seek Speak".

They have chosen these patterns:


But you know what? 
Last week turned into a zoo!  I simply don't know what happened to it!

I had planned on advertising this give-away more, to let more seamstresses have a chance at these patterns.  But circumstances prevailed.....

So, I am planning ANOTHER give-away soon!

Stay tuned.......


Many thanks to Debi at My Happy Sewing Place

Thank you Debi, for your kind words about my first give-away!

Source

Friday, December 2, 2011

Painting the Bathroom Cabinets, or "Rustoleum Cabinet Transformations"

Well, I finished painting the bathroom cabinets a while ago----
Using the Rustoleum Cabinet Transformations kit that we decided to use waaaayyyy back in July.

You get a choice of the "Light" or "Dark" Color Kit.  You can also choose the small (covers 100 square feet) or large (covers 200 square feet) size kit.

Here's the "Light" Color Kit:
The "Dark" Color Kit, naturally enough, has loads of dark colors.

Here's the link to all the colors of paint available in these kits: Rustoleum Colors.

Here's what your get in the kit:

 Deglosser: The 1st Step. 
You use the scrub pad (included) to get off all the dirt and take the sheen off your cabinets. It's important to really get into all the little corners and crevices and scrub well.  Then clean off your cabinet frames and doors.
Bond Coat: The 2nd Step. 
It's basically the paint.
First, wipe down everything with the gauze (included).  

Then paint. At least 2 coats (I used three).  Rustoleum gives great instructions on how to do this.
Glaze: Next is the optional glaze.  We elected NOT to use the glaze.
Top Coat: Finally, there's the protective top coat. 
Also in the kit:
  • Paint stick stirrers
  • Instructional video
  • Instruction sheet
Extras you will need to purchase:
  • 2 inch paintbrushes
  • Foam paintbrush (if you use glaze)
  • Gloves
  • Painter's tape
  • Drop cloths
  • Cleaning-up stuff
 So, the Big Question----How did this kit work for us?

First of all, the kit was very convenient.  Purchasing everything together was super easy.  And it was cost-effective, I thought.

Next, I really think that the paint was high quality.  And the kit was not hard to use.  It's all water-based, so it's easy to clean up and low-odor.

We did remove all of our cabinet doors.  This may not have been necessary.

And I did sand the cabinet doors.  There were some lumps and  bumps left from when they were painted previously (not by me!)

In retrospect, I should have sanded them even more.  I really don't think the de-glosser did the trick completely.   I think the paint (maybe!) would have stuck better with more sanding---and would have looked smoother.  There's just no substitute for sanding.

Also, the paint was sorta weird.  It didn't spread very well, and took some careful brushing (and three coats) to cover well.  But it seems to be holding up well--mostly.

The protective coat was the hardest to deal with.  It's quite runny, and after all the care I took to make sure I didn't have any drips-----well, I still had some drips.

Also, the top coat is a satin coat--so don't expect glossy!

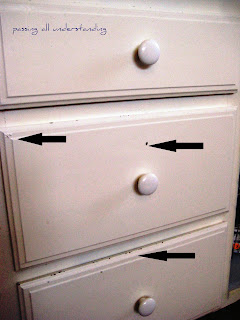
My biggest problem is that I've had a couple of chipped spots in the last 6 months.  I don't know if that's because I should have sanded more thoroughly, OR because it was so darn hot (about 104 F) when I was painting this summer, OR who knows what.

But I've got to go back and fix those little chips.

Also, it's quite a long process.  You have to let everything dry between steps.  So I'd say it's a week-long project and not a weekend project!  But again, maybe I'm just slow.....

I will say that the cabinets look SO MUCH better!  And the protective coat really does clean up well--just wipe with a damp cloth to make the cabinets all sparkly again!

So, remember the old chipped and dinged cabinets?
 They look sooooooo much better now!  While not perfect, it's a great improvement.

 
For more information, go to Rustoleum Cabinet Transformations.
Other reviews:
P.S. I received no compensation for this review.

New (To Me) Tuesday

A beautiful blog: Oh, the Lovely Things . Beautiful photography, beautiful art, beautiful simplicity, beautiful projects.... Like this o...