
Well, I finished painting the bathroom cabinets a while ago----
Using the Rustoleum Cabinet Transformations kit that we decided to use waaaayyyy back in July.
 You get a choice of the "Light" or "Dark" Color Kit. You can also choose the small (covers 100 square feet) or large (covers 200 square feet) size kit.
Here's the "Light" Color Kit:
 The "Dark" Color Kit, naturally enough, has loads of dark colors.
Here's the link to all the colors of paint available in these kits: Rustoleum Colors.
Here's what your get in the kit:


Using the Rustoleum Cabinet Transformations kit that we decided to use waaaayyyy back in July.


Deglosser: The 1st Step.
You use the scrub pad (included) to get off all the dirt and take the sheen off your cabinets. It's important to really get into all the little corners and crevices and scrub well. Then clean off your cabinet frames and doors.
Bond Coat: The 2nd Step.
It's basically the paint.
First, wipe down everything with the gauze (included).

Then paint. At least 2 coats (I used three). Rustoleum gives great instructions on how to do this.

Glaze: Next is the optional glaze. We elected NOT to use the glaze.

Top Coat: Finally, there's the protective top coat.

Also in the kit:
- Paint stick stirrers
- Instructional video
- Instruction sheet
Extras you will need to purchase:
- 2 inch paintbrushes
- Foam paintbrush (if you use glaze)
- Gloves
- Painter's tape
- Drop cloths
- Cleaning-up stuff
So, the Big Question----How did this kit work for us?
First of all, the kit was very convenient. Purchasing everything together was super easy. And it was cost-effective, I thought.
Next, I really think that the paint was high quality. And the kit was not hard to use. It's all water-based, so it's easy to clean up and low-odor.
We did remove all of our cabinet doors. This may not have been necessary.

And I did sand the cabinet doors. There were some lumps and bumps left from when they were painted previously (not by me!)
In retrospect, I should have sanded them even more. I really don't think the de-glosser did the trick completely. I think the paint (maybe!) would have stuck better with more sanding---and would have looked smoother. There's just no substitute for sanding.
Also, the paint was sorta weird. It didn't spread very well, and took some careful brushing (and three coats) to cover well. But it seems to be holding up well--mostly.
The protective coat was the hardest to deal with. It's quite runny, and after all the care I took to make sure I didn't have any drips-----well, I still had some drips.
Also, the top coat is a satin coat--so don't expect glossy!
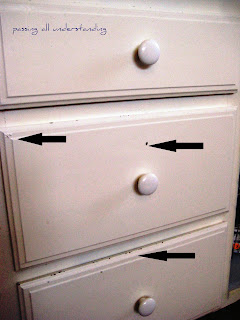
My biggest problem is that I've had a couple of chipped spots in the last 6 months. I don't know if that's because I should have sanded more thoroughly, OR because it was so darn hot (about 104 F) when I was painting this summer, OR who knows what.
But I've got to go back and fix those little chips.
Also, it's quite a long process. You have to let everything dry between steps. So I'd say it's a week-long project and not a weekend project! But again, maybe I'm just slow.....
Also, it's quite a long process. You have to let everything dry between steps. So I'd say it's a week-long project and not a weekend project! But again, maybe I'm just slow.....
I will say that the cabinets look SO MUCH better! And the protective coat really does clean up well--just wipe with a damp cloth to make the cabinets all sparkly again!
So, remember the old chipped and dinged cabinets?

They look sooooooo much better now! While not perfect, it's a great improvement.


For more information, go to Rustoleum Cabinet Transformations.
Other reviews:
Other reviews:
P.S. I received no compensation for this review.


No comments:
Post a Comment